人生如登山
人生如登山
人生如登山,可以从很多侧面去看,但是我有这个感觉,主要来源与读王小波的《我的精神家园》里的一段:
有人问一位登山家为什么要去登山 – 谁都知道登山这件事既危险,又没有什么实际的好处。 他回答道:”因为那座山峰在那里”。我喜欢这个答案,因为里面包含着幽默感 – 明明是自己要登录,偏说是山在那里使他心里痒痒。
我也喜欢这个回答。
我觉得其中不止是幽默,当他登山时,心中其实真只有登山而已。这点看似简单,其实并不容易做到。
人生如登山
人生如登山,可以从很多侧面去看,但是我有这个感觉,主要来源与读王小波的《我的精神家园》里的一段:
有人问一位登山家为什么要去登山 – 谁都知道登山这件事既危险,又没有什么实际的好处。 他回答道:”因为那座山峰在那里”。我喜欢这个答案,因为里面包含着幽默感 – 明明是自己要登录,偏说是山在那里使他心里痒痒。
我也喜欢这个回答。
我觉得其中不止是幽默,当他登山时,心中其实真只有登山而已。这点看似简单,其实并不容易做到。
清明时节回乡祭扫,傍晚出发,快清晨才到。
区别于一路高速拥堵的喧嚣与烦躁,一入乡村万物都静了下来。天渐微亮,微光给一切沉静批上一层薄纱。车轮碾过石子的咔哧咔哧之声轻声宣告着我们的回来,车灯打破万籁俱静,被强光吓到的蛤蟆赶紧蹦跳着让路 – 这是我们回到老家乡下的第一晚。
所谓相爱,不是互相凝视得多深,而是一起望得有多远。
-- 佚名上面这句话忘了是在某书还是某视频上看到的,当时觉得很有相爱的一种禅意。但禅意在哪里,也说不出,过了几天,忽想起一个老套的故事,得解。
numpy 提供了一系列的函数来方便对ndarray进行操作,这些函数基本上都有2个特点:
这也就是说,当遇到此类需求时,使用 ufunc 可以提供高效而又方便的操作,日常进行数据处理时应该常用。
比如,对数组内的每个元素求平方根:
1 | arr = np.arange(3) # [0 1 2] |
上一章我们一起学习了 numpy 库的基础知识,以及 np 的主要数据结构ndarray。
我们都知道,程序 = 数据结构 + 算法,这章中,我们一起学习下基于 ndarray 这个多维数组的一些基础运算。
本章所说的运算主要是 numpy 中 ndarray 的运算。在我们平常的编程工作中,数组的运算应该是用得最多的运算了,我们常常需要把数据放到数组里(也就是给数组赋值),遍历数组,对数组中数据进行处理等。在大数据处理中,数组的运算就更为重要了。下面介绍一些初级的数组运算,随着我们进一步的学习,后面会学习更多更高级运算以及结合统计学或线性代数的知识学习更多运用的场合。
学习时,可以边对照着下面的导图边学习各章内容,这样思路会更清晰。
从今天开始,我们一起来学习python数据处理基础~我们将从一些基本的工具,如numpy, pandas等学起;然后结合这些工具学习概率论、统计学、一般数理统计方法等。
本章我们主要一起学习什么是 numpy,为什么我们要学习使用numpy。以及介绍下numpy中主要的数据结构ndarray。
1 | class Rectangle: |
“The aim of marketing is to know and understand the customer so well that the product or service fits him and sells itself.”
“市场营销的目的是充分了解和理解顾客,从而使产品或服务迎合客户需求并实现自我推销。”-- —彼得•德鲁克「现代管理学之父」
为什么有些公司似乎在不断创新,开发出让我们高兴的产品?为什么他们似乎比我们更早知道我们需要什么?他们是如何创造出我们永远不会放弃的产品的 —— 即使它们在五年或十年前甚至还不存在 —— 以至于一些人一经使用则无法离开?
答案是基于对客户当前和未来需求的深刻理解。它是一种了解客户的能力,你要探索他们面临的问题,并预测他们在多种情况下的行为。
成功的公司对客户有一套完整的方法论,并与理解技术的人合作,以解决客户的问题为中心,开发新产品或服务,吸引客户,并使用其为之付费。
了解客户的声音 (VoC) 不仅能让你了解如何打造客户会购买的产品,还能让你创造出令客户满意的产品和服务,并解决他们最迫切的需求。
1958年,计算机科学家罗森布拉特(Rosenblatt)就提出了一种具有单层网络特性的神经网络结构,称为“感知器”( perceptron)。感知器出现之后很受瞩目,大家对它的期望很高。然而好景不长 —— 一段时间后,人们发现感知器的实用性很弱。 1969年,AI的创始人之一马文·明斯基(Marvin Minsky)指出简单神经网络只能运用于线性问题的求解。这之后神经网络就逐渐被遗忘了。
直到1985年,杰弗里·辛顿(Geoffrey Hinton,深度学习“三巨头” 之一)和特伦斯·谢诺夫斯基( Terrence Sejnowski)提出了一种随机神经网络模型——受限玻尔兹曼机。紧接着, Rumelhart、Hinton、Williams提出了BP算法,即多层感知器的梯度反向传播算法。这也是神经网络的核心算法,人们以此为基础搭建起几乎现代所有的深度网络模型。
因此,可以说神经网络的理论基础在20世纪60年代出现,并在80年代几乎完全形成。 在工程界,当时神经网络也已经有了应用。杨立昆( Yann Le Cun, 深度学习“三巨头”之一)于20世纪80年代末在贝尔实验室研发出了卷积神经网络,他将其应用到手写识别和OCR,并在美国广泛应用于手写邮编、支票的读取。然而后来,另一种理论相当完善的机器学习技术支持向量机( Support Vector Machine,SVM)被发明出来,成为了业界“新宠”,神经网络再一次被遗忘了。
大约2009年,计算机最终有了足够的算力进行深度计算,神经网络开始在语音和图像识别方面战胜传统算法。杰弗里·辛顿、杨立昆和约书亚 ·本吉奥(Yoshua Bengio)3人联合提出深度学习的概念。这是新瓶装旧酒,名称变了,技术还是一样的技术。然而时代也已经改变,此时深度神经网络开始实证性地在工程界展示出绝对的优势。
2012年年底,基于卷积神经网络模型的Inception结构在ImageNet图片分类竞赛中获胜。此后深度学习火山爆发式发展,科技“巨头”们开始在这个领域投资:计算机视觉、语音识别、自然语言处理、棋类竞赛和机器人技术,这些应用领域的突破一个接着一个出现。
其实,从一开始就不是神经网络不行,而是原来的数据量和计算速度两方面都跟不上。在这个数据泛滥的时代,海量数据的获取不再是什么难事。可以预见,在5G时代,深度学习必然还会有更大发展的空间。
好像这个神经网络的原理和线性回归或者逻辑回归 完全相同,不就是通过不断地训练寻找最佳的参数嘛!” 咖哥答:“你说得简直太正确了!它们本来就是一回事,唯一的不同 是,神经网络的参数多、层级深,需要的数据量也多。”
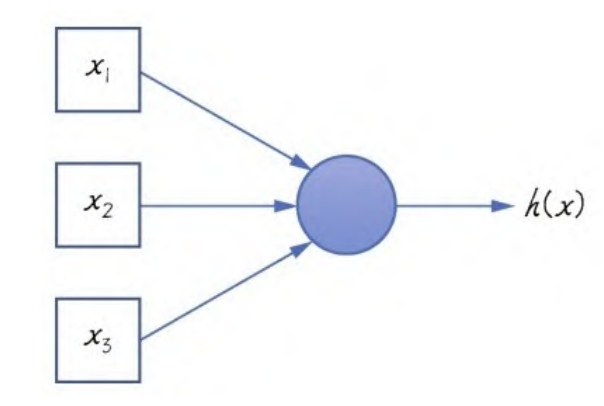
感知器是神经网络的雏形,最初的神经网络也就是只有一个神经元的感知器,如下图:

上图的圆圈就代表一个神经元,它可以接收输入,并根据输入提供一个输出。
Sigmiod函数,在逻辑回归中叫逻辑函数,在神经网络中则称为激活函数,用以类比人类神经系统中神经元的“激活”过程。
序贯(sequential)模型,也可以叫作顺序模型,是最常用的深度网络层和层间的架构,也就是一个层接着一个层,顺序地堆叠.密集(dense)层,是最常用的深度网络层的类型,也称为全连接层,即当前层和其下一层的所有神经元之间全有连接。1 | import keras |
上面模型输出如下:
1 | Model: "sequential" |
summary 方法显示了神经网络的结构,包括每个层的类型、输出张量的形状、参数数量以及整个网络的参数数量。
这个网络只有3层,493个参数(就是每个神经元的权重等)。
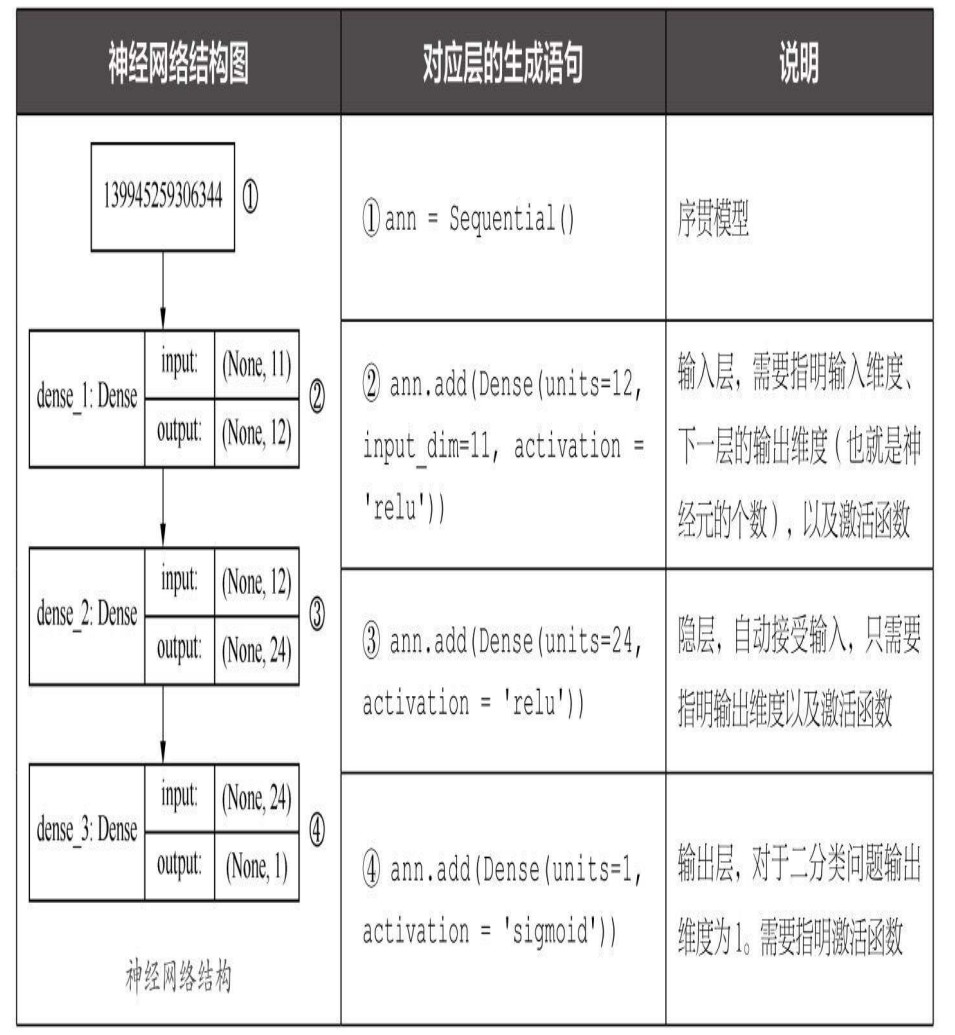
我们可以用代码输出神经网络的形状结构图
1 | from IPython.display import SVG |
如下图:

用Sequential模型的compile方法对整个网络进行编译时,需要指定以下几个关键参数。
优化器(optimizer):一般情况下,“adam”或者“rmsprop”都是 很好的优化器选项,但也有其他可选的优化器。等一会我们再稍微深入地说说优化器的选择。损失函数(loss):对于二分类问题来说,基本上二元交叉熵函数 (binary_crossentropy)是固定选项;如果是用神经网络解决线性的回归问题,那么均方误差函数是合适的选择。评估指标(metrics):这里采用预测准确率 acc(也就是accuracy的缩写,两者在代码中是等价的)作为评估网络性能的标准;而对于回归问题,平均误差函数是合适的选择。准确率,也就是正确地预测占全部数据的比重,是最为常用的分类评估指标。1 | ann.compile(optimizer='adam', # 优化器 |
下面开始训练刚才编译好的神经网络。和其他传统机器学习算法一样,神经网络的拟合过程也是通过fit方法实现的。
1 | # 通过history变量把训练过程中的信息保存下来,留待以后分析 |
训练后,命令行会输出每次迭代的结果,最终落到最后准备率上。
训练过程中输出的信息包括每轮训练的损失值、准确率等。但是这个输出信息有30轮的数据,很冗长、看起来特别费力。我们可以将之图形化输出,以直观展示ANN训练过程。
假设有一个手机生产厂商,每天生产手机1000部。某一天生产的手机中,出现了2个劣质品。
目前要通过机器学习来分析数据特征(如手机 的重量、形状规格等),鉴定劣质品样本。其中机器学习模型的预测结果显示合格品 999 个,劣质品1个。
从上面的例子中,我们运用之前的知识、其准确率为99.9%。因为准确率就是预测命中的数据个数/数据总数,即 999/1000。1000个样本只猜错一个,可以说是相当准的模型了。
然而从我们的目标来说,这个模型实际上是失败了。这个模型本就是为了检测劣质品而生(劣质品即标签值为1的阳性正样本),但一共有 2个劣质品,只发现了1个,有50%的正样本没有测准。
因此,模型的好与不好,是基于用什么标准衡量。对于这种正样本和负样本比例极度不平衡的样本集,我们需要引进新的评估指标。
另一个标准是召回率,也叫查全率。你们听说过“召回”这个名词 吧,就是劣质品蒙混过了质检这关,“跑”出厂了,得召回来,销毁掉。 这和精确率是成对出现的概念。
把精确率和召回率结合起来,就得到F1分数。这是一个可以同时体现上面两个评估效果的标准,数学上定义为精确率和召回率的调和均值。它也是在评估这类样本分类数据不平衡的问题时,所着重看重的标准。
之所以分类数据不平衡会影响机器学习模型的预测结果,是因为许多模型的输出类别是基于阈值的,如逻辑回归中小于0.5的为反例,大于等于 0.5的则为正例。因此,在数据不平衡时,默认的阈值会导致模型输出倾向 于数据多的类别。
对于神经网络而言,特征缩放(feature scaling)极为重要。神经网络不喜欢大的取值范围,因此需要将输入神经网络的数据标准化,把数据约束在较小的
区间,这样可消除离群样本对函数形状的影响。
对数据进行标准化。其步骤是:对于输入数据的每个特征(也就是输入数据矩阵中的一整列),减去特征平均值,再除以标准差,之后得到的特征平均值为0,标准差为1。
1 | from sklearn.preprocessing import StandardScaler # 导入特征缩放器 |
通过正向传播和反向传播,神经网络实现了内部参数的调整。下面我们说说神经网络中的可调超参数。
优化器相当于是用来调解神经网络模型的“手柄”,它在前面的代码中曾经出现过。
1 | ann.compile(optimizer = 'adam', # 优化器 |
编译神经网络时的optimizer = 'adam'中的adam,就是一个优化器。
神经网络中不仅存在局部最低点,还存在鞍点。因此在
1. 神经网络权重参数随机初始化